Each complete kit includes everything needed for professional acoustic panel installation: clips and screws.
Z-clips are the preferred mounting system in professional acoustic installations. One clip mounts to the wall, the other to the back of the panel. They interlock securely, distributing weight evenly while allowing easy removal when needed.
The interlocking design ensures panels hang straight every time. Unlike adhesive or screw-through methods, Z-clips provide consistent, professional results.
Need to repaint? Rearranging panels? Moving locations? Z-clips allow easy removal and reinstallation without damaging your panels.
Most panels install in 5–10 minutes. Only basic tools required (drill/screwdriver and level).
Common questions about this product
Top questions our customers ask about this panel. See all 229 FAQs or call (888) 923-5777.
What's the best installation method for renters with acoustic panels?
For renters, 3M Command Strips provide damage-free acoustic panel installation. Use large picture hanging strips - they hold acoustic panels securely but remove cleanly without damaging walls. Use 4-6 strips per 24"x24" panel, rated for the panel's weight.
Renter-friendly acoustic panel mounting:
- 3M Command Strips (large picture hanging strips)
- Lean panels against walls on furniture
- Tension rod systems for corner placement
- Removable adhesive hooks for lightweight panels
This damage-free approach works for:
- Apartment home studios
- Rental office spaces
- Temporary restaurant installations
- Leased pickle ball court facilities
Our lightweight PET felt acoustic panels (NRC 0.88) are perfect for Command Strip mounting: https://acousticsoundpanels.com/products/felt-acoustic-ceiling-tiles-acoustical-ceiling-tiles-acoustic-ceiling-panels. For heavier 2-inch panels, use heavy-duty strips: https://acousticsoundpanels.com/collections/acoustic-sound-panels/products/custom-built-acoustic-sound-panels-2-inch
Always check strip weight ratings against panel weight. Call (888) 923-5777 for alternative renter-friendly mounting solutions.
How do I install acoustic panels on drywall?
Installing acoustic panels on drywall is simple with our included Z-clips. Every acoustic panel order includes Z-clips at no extra charge. When you can't hit a stud, use heavy-duty drywall anchors like E-Z Ancor Stud Solver (50 lb rating) for secure mounting.
Drywall installation for acoustic panels:
- Z-clips into studs: Best option (hardware included)
- Z-clips with drywall anchors: When studs aren't accessible
- Heavy-duty anchors: E-Z Ancor or similar 50+ lb rated
- Toggle bolts: Alternative for hollow walls
Installation tips for acoustic panels:
- Use stud finder when possible
- Level for professional alignment
- Space panels 2-6 inches apart
- Test anchor weight rating
Perfect for drywall acoustic treatment in:
- Recording studios and home theaters
- Restaurant dining areas
- Church fellowship halls
- Indoor pickle ball courts
Our 2-inch acoustic panels include all mounting hardware: https://acousticsoundpanels.com/collections/acoustic-sound-panels/products/custom-built-acoustic-sound-panels-2-inch. Lightweight PET felt options also available: https://acousticsoundpanels.com/products/felt-acoustic-ceiling-tiles-acoustical-ceiling-tiles-acoustic-ceiling-panels
Call (888) 923-5777 for installation support.
Can I install acoustic panels on concrete walls?
Yes, concrete walls require masonry anchors for acoustic panel installation. Use a hammer drill with masonry bits to create pilot holes, then install concrete anchors to secure the Z-clips that come free with your acoustic panels.
Concrete wall installation for acoustic panels:
- Tapcon screws with Z-clips (recommended)
- Toggle-style masonry anchors
- Construction adhesive (permanent option)
- Furring strips for multiple panels
Tools needed for acoustic panels on concrete:
- Hammer drill
- Masonry bits
- Level
- Safety glasses
Common concrete wall applications:
- Basement recording studios
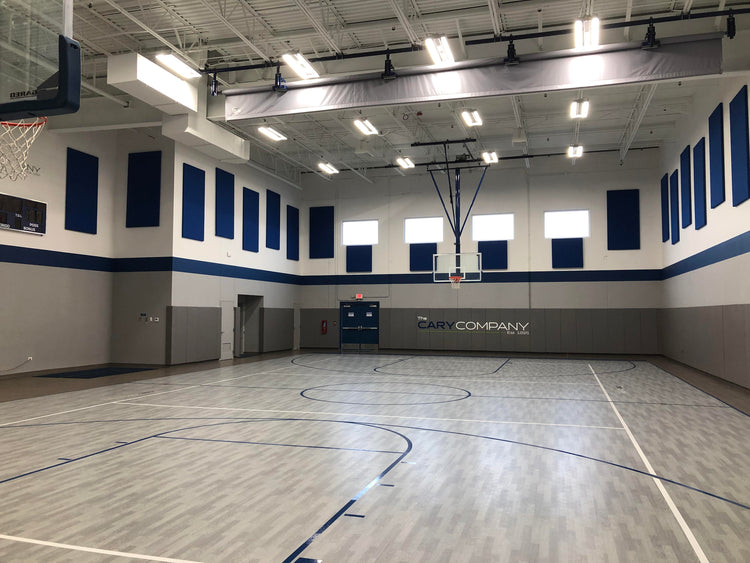
- Gymnasium acoustic panels
- Church basement fellowship halls
- Restaurant brick walls
- Pickle ball court cinder blocks
Our 2-inch acoustic panels (NRC 1.0) transform hard concrete surfaces: https://acousticsoundpanels.com/collections/acoustic-sound-panels/products/custom-built-acoustic-sound-panels-2-inch. For industrial spaces, consider durable PET felt: https://acousticsoundpanels.com/products/felt-acoustic-ceiling-tiles-acoustical-ceiling-tiles-acoustic-ceiling-panels
Call (888) 923-5777 for masonry installation tips.
Installation & Mounting Methods
Installation & Mounting
Standard Method: Z-Clips (French Cleats)
- Hardware included with every order
- Z-clips screw into wall studs or drywall anchors
- Panel hangs on the clips , lifts on and off easily for repositioning
- Best for customers who may want to move panels later
Permanent Method
- Construction adhesive on clean, dry surfaces
- No removal possible
Weight
- 4×8 two-inch panels weigh 25–30 lbs
- Always recommend two people for installation
- Smaller panels (2×4, 2×2) are manageable solo
Ceiling Installation
- Suspension hardware available
- Ask customer for ceiling type , we'll spec the right kit
- Drop ceilings: we cut panels to fit standard T-bar grids
- Ceiling acoustic clouds are highly effective for restaurants and open spaces
Rule of Thumb for Ceiling vs Wall
Treat side walls first, then add ceiling clouds. Ceiling treatment is the next step, not the first.How do you install and mount acoustic panels on the wall?
Panels come with Z-clips (French cleats) that mount into wall studs or drywall anchors. The panel hangs on the clips and lifts off easily for repositioning. 4x8 panels weigh 25–30 lbs , plan for two people.
How do I install acoustic panels on the ceiling?
Ceiling acoustic panels mount using the internal wood frame around each panel's perimeter. Attach eye hooks to this frame for wire hanging, or use our ceiling mount kit for secure installation. For drop ceilings, acoustic panels rest directly on the grid.
Ceiling installation options for acoustic panels:
- Wire hanging: Eye hooks into panel frame
- Ceiling mount kit: Direct attachment system
- Drop ceiling: Panels rest on existing grid
- Cloud suspension: Cable systems for floating panels
Ceiling acoustic panels are critical for:
- Pickle ball courts (eliminate overhead echo)
- Restaurants (control noise from above)
- Gyms with high ceilings
- Churches (reduce excessive reverb)
Our 2-inch acoustic panels (NRC 1.0) work perfectly for ceilings: https://acousticsoundpanels.com/collections/acoustic-sound-panels/products/custom-built-acoustic-sound-panels-2-inch. For drop ceiling tiles, consider PET felt: https://acousticsoundpanels.com/products/felt-acoustic-ceiling-tiles-acoustical-ceiling-tiles-acoustic-ceiling-panels
Ceiling mount kits available. Call (888) 923-5777 for suspended cloud installation options.
What are corner bass traps and how do I install them?
Corner bass traps are triangular acoustic panels designed to fit room corners where low-frequency sound accumulates. These stackable triangular panels target bass frequencies below 250Hz that cause muddiness in music and speech. Most can simply be tucked into corners without mounting.
Corner bass trap benefits for acoustic treatment:
- Recording studios (essential for accurate mixing)
- Home theaters (tighter bass response)
- Churches (reduce boomy vocals)
- Restaurants (control low-frequency buildup)
- Pickle ball courts (eliminate corner echo)
Installation is simple - bass traps can be stacked floor-to-ceiling and often just tucked into corners without any mounting hardware. The triangular shape creates an air gap that enhances bass absorption. Most rooms benefit from treating at least two front corners.
Our custom corner bass traps are available here: https://acousticsoundpanels.com/collections/bass-traps/products/custom-built-corner-bass-traps. Stack multiple units for floor-to-ceiling coverage.
Call (888) 923-5777 for corner bass trap sizing recommendations based on your room dimensions.
Can acoustic panels be installed outdoors?
Standard acoustic panels are designed for indoor use only. For covered outdoor areas like pavilions or patios with roofs, we offer weather-resistant acoustic panel options. Full outdoor exposure requires specialized acoustic barrier products beyond standard panels.
Outdoor acoustic panel applications:
- Covered restaurant patios (weather-resistant options)
- Pavilion pickle ball courts (protected from rain)
- Church outdoor amphitheaters (covered stages)
- Gym covered walkways
- Protected outdoor dining areas
Weather-resistant acoustic panels need protection from direct rain and UV exposure. Even our most durable PET felt panels require overhead coverage. For fully exposed outdoor acoustic treatment, consider acoustic barrier fencing or specialized outdoor products.
Our PET felt panels work in covered outdoor spaces: https://acousticsoundpanels.com/products/felt-acoustic-ceiling-tiles-acoustical-ceiling-tiles-acoustic-ceiling-panels. For indoor spaces that open to outdoors, use standard panels: https://acousticsoundpanels.com/collections/acoustic-sound-panels/products/custom-built-acoustic-sound-panels-2-inch
Call (888) 923-5777 to discuss weather-resistant options for your covered outdoor space.

![],"description": "Acoustic Panel Mounting Hardware - Professional Z-Clip Installation Kit\n\nProfessional-grade Z-clip mounting system for secure, level installation of acoustic panels on walls and ceilings - the same hardware system used in commercial acoustic installations worldwide. Our improved heavy-duty Z-clips provide rock-solid mounting for acoustic panels of any size and weight. Each kit includes everything needed for professional panel installation - clips, screws, anchors, and instructions.\n](http://acousticsoundpanels.com/cdn/shop/files/Z-Clips_400x600_aab6f4f9-594d-4583-a94b-6e90be079123_535x.png?v=1771901644)


![Load image into Gallery viewer, ],"description": "Acoustic Panel Mounting Hardware - Professional Z-Clip Installation Kit\n\nProfessional-grade Z-clip mounting system for secure, level installation of acoustic panels on walls and ceilings - the same hardware system used in commercial acoustic installations worldwide. Our improved heavy-duty Z-clips provide rock-solid mounting for acoustic panels of any size and weight. Each kit includes everything needed for professional panel installation - clips, screws, anchors, and instructions.\n](http://acousticsoundpanels.com/cdn/shop/files/Z-Clips_400x600_aab6f4f9-594d-4583-a94b-6e90be079123_400x@2x.png?v=1771901644)